Category Archives: Tips

Hurricane Preparedness Tech Guide

iFixYouri has multiple Florida locations, which means we are no strangers to being in hurricane watch and warning zones. We’ve put together this list of hurricane preparedness tech guide that relate to you being able to use your technology to communicate and stay safe during a hurricane or other emergencies.

Phones and Tablets

  • Charge all laptops and turn them off. Laptops can be used to charge phones.
  • Limit use of your phone for entertainment.
  • Turn down phone brightness to conserve battery life. For some phones (AMOLED screens), switching to greyscale mode conserves more energy.
  • Invest in a water proof case. In a pinch, you can use a heavy duty Ziploc to keep your tech dry.
  • Save emergency numbers in your phone if you haven’t already.
  • Save the following PDFs to your phone in case you lose reception:

Phones can also be used before emergencies for documentation. Scan or take photos of important personal documents. You can also record videos of your personal belongings for insurance purposes.

Computers

  • Back up your data either to external storage or a cloud service. Keep external copies in as watertight of a place as you can manage.
  • Shut down your computer and turn off your monitor. Turn off any peripherals, such as printers and external drives.
  • Unplug the power cords from all devices. Surges can happen when power is restored. Unplugging from the wall will help ensure the devices will be protected.
  • Unplug the network cable going to your computer, as well as your printer. Lightning can send voltage through these lines, possibly damaging your network cards.

Do you have any other hurricane preparedness tech guide pointers emergency situations? Please share them in the comments and share this post with your friends and loved ones. Stay safe.

iPod Touch 5th Gen Battery Replacement: How To

Introduction

iPod Touch 5th gen battery replacement is moderately difficult. The eight clasps holding the screen onto the body will make snap noises when they are unclasped. Don’t immediately pull the screen from the body as you will probably tear the cable to the home button. Step by step instructions are below the video.

Tools Needed

  • Razor Blade
  • Metal Spudger [BUY]
  • Phillips Head Screwdriver #000 [BUY]
  • Hot Air Rework Station
  • Spudger [BUY]
  • Soldering Station
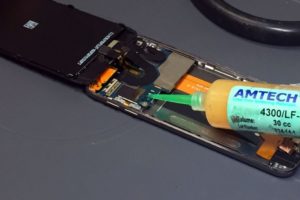
  • Flux

Recommended: Magnetic mat [BUY], screw capsules [BUY]

General Repair Guidelines:

  • Always use good lighting – smart device components are small and you’ll need plenty of light to see what you
    are doing.
  • Maintain a clean, organized workspace so you don’t lose or confuse any components.
  • Apply enough heat to loosen adhesive but not enough to damage the device.
  • After separation, keep the back housing and screen in close proximity until all flex cables or other wire
    cables are disconnected.

iPod Touch 5th Gen Battery Replacement Steps

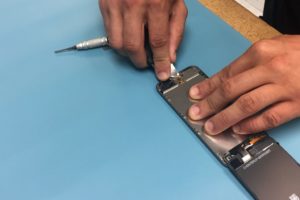
  1. Starting at the bottom near the home button, slide the corner of a razor blade in between the screen and the
    bottom frame to begin separating the screen from the body.
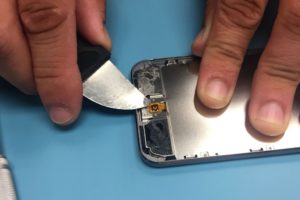
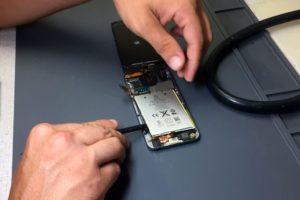
  2. Use the metal spudger to slowly and carefully separate the glass screen of the iPod from the body. Start on the
    bottom edge of the device and proceed slowly. Eight brackets connect the screen to the body.

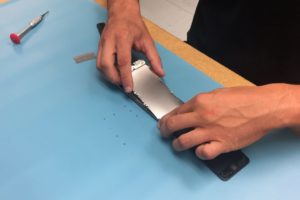
  3. Continue using the metal spudger to gently separate the glass from the body up the sides and across the top. Don’t
    push too deeply towards the center of the device. When all the brackets have been pryed open, slowly pull the
    top of the screen away from the body.
  4. The home button is connected via an orange flex cable, so do not pull the back glass far from the frame.
    Disconnect the cable from the heat shield of the iPod.

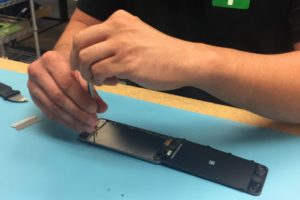
  5. After disconnecting the home button flex cable, remove the eight screws from the silver heat shield and set to
    the side.

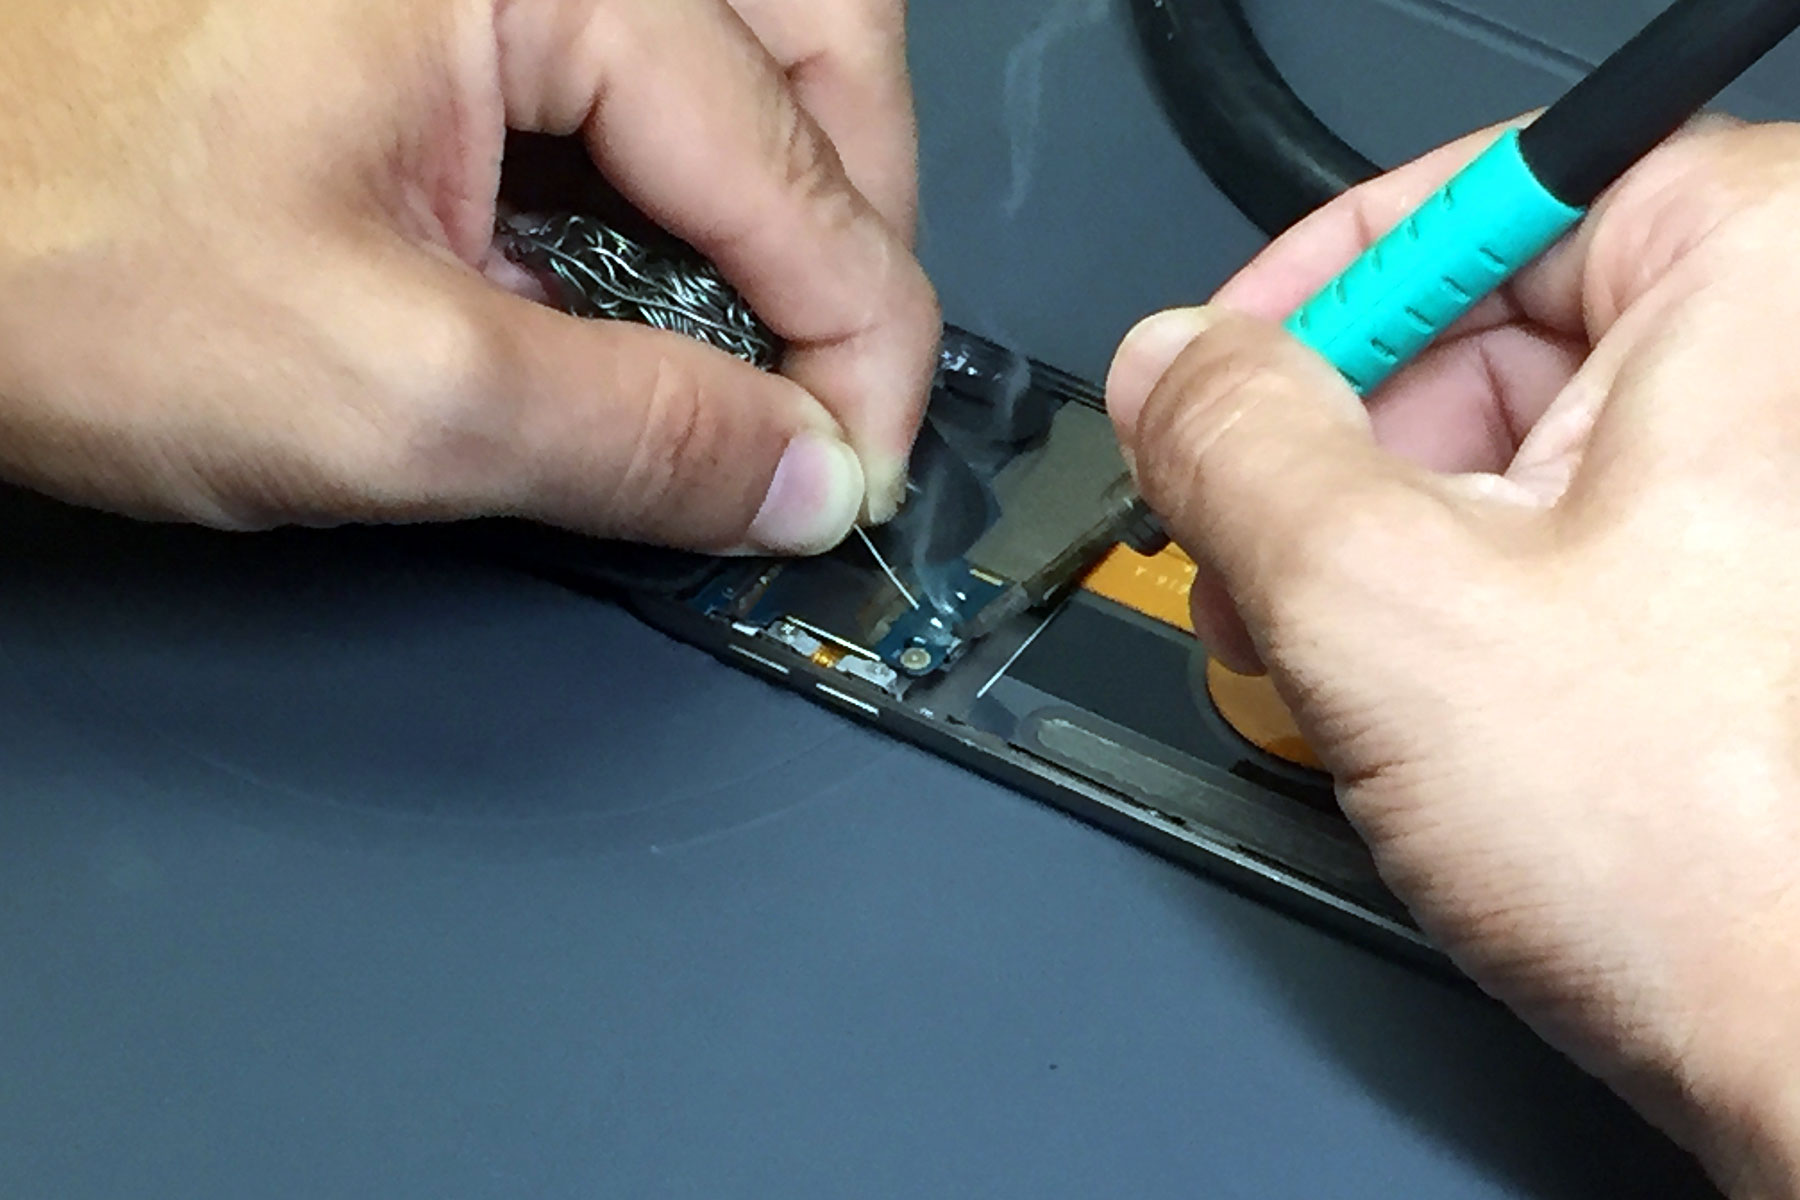
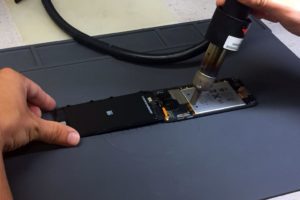
  6. The next steps involve removing the battery flex cable using a hot air rework station. Focus the heat on the
    black film and Kapton tape that needs to be removed while heating. This is located on the left side just above
    the battery.
  7. Once the cable can be removed, pop out the battery with a spudger.
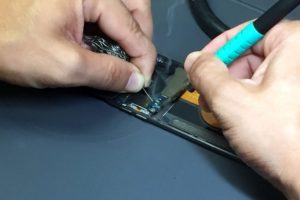
  8. The replacement battery must be soldered into place using a soldering iron, flux, and tweezers to hold the
    cable in place.
  9. With your new replacement battery connected, you should now be able to boot up the device. You can work
    backward from step 7 to complete the repair. Be sure to cover the new solder points with Kapton tape before
    reinstalling the heat shield. If Kapton tape is not added the heat shield could short out the device.

For Help, Repairs, or Parts

If you need parts or tools for this repair, or if this repair is too much to attempt on your own and you need
professional help with your iPod Touch Repair, contact iFixYouri at 888-494-4349 or www.ifixyouri.com.

When To Replace Your Phone’s Battery

Because of modern society’s love of smartphones, most of us keep a watchful eye on battery levels. When our phone’s power level is getting low, life can become a rush to find an outlet to charge back up so we can return to our interconnected day. As cell phone batteries age, they lose the ability to hold a charge and our outlet search anxiety becomes more frequent. But did you know there is also a safety risk involved with carrying around a phone with an old battery? Old batteries can expand, damaging the device they were meant to power, heat up, and sometimes even explode.

The Brief Life Story of a Battery

Rechargeable batteries may run for a long time but they do have a limited lifespan. iPhone batteries, for example, are good for roughly 600 charge cycles, after that performance starts to degrade, necessitating a battery replacement. Sometimes a replacement is required much earlier, such as when the unit routinely fails to charge, gets noticeably warmer, or runs out of power quickly.

What Causes Batteries To Explode?

Cell phone batteries are lithium ion batteries, which differ from the alkaline AA’s you have in your cable remote. Lithium-ion batteries are rechargeable and rely on the chemical lithium as their power source. Typically these are built directly into smartphones. Lithium-ions are a newer type of battery than alkalines and allow quite a bit more voltage. However, this increased power also increases some possibilities for combustion. Cheap manufacturing, rough treatment or impacts, overheating, or improper charging process (determined by device software, as well as accessories) can sometimes lead to a thermal runaway which concludes with a literal bang.

So How Do We Take Charge of Our Battery Life?

Always make sure to use high quality charging accessories. Many modern phones provide notifications when charging blocks are not the proper voltage. Pay attention to them. They do this to get the best performance and quality out of your battery. Avoid the super discount junk chargers found in gas stations and opt to purchase quality accessories from specialized phone companies, like iFixYouri.

Owners may choose to replace batteries themselves as sometimes spare batteries are available online at reasonable prices. However, the benefit of bringing your phone with the old battery intact to a professional repair company like iFixYouri for battery replacement is that you can be sure a high-quality battery is installed correctly and comes with a warranty.

Why You Shouldn’t Buy Cheap Chargers

Beware of cheap chargers! It’s not just your phone you have to worry about blowing up on you (Sorry, Samsung). It’s safe to say that most of us have been caught in the wild without a charger and 2% battery and succumbed to the $8.99 iPhone charger at the gas station. You know the type; sold right next to the male-enhancement pills and questionable energy tonics, not the familiar clean white but instead a color that reminds you of bad candy. While these may be fine in a pinch, we recommend avoiding using these chargers regularly. Reports of fire, electrocutions, and (much worse) damage to phones have been widespread. These cheap chargers, sometimes blatant counterfeits designed to look similar to official accessories, are inexpensive for a reason. Let’s take a look at a MacBook charger, since its larger size makes things easier to see. The official Apple charger is on the left, the knockoff on the right.

macbook charger
Original vs. Cheap MacBook Charger

The biggest issue regarding the safety in these knockoff chargers has to do with insulation. These devices are designed to take a very powerful electrical current from your wall and convert it into something that can safely charge your laptop. As you can imagine, a lot of safeguards are required to prevent wires from crossing and to distribute the electrical load evenly. Those safeguards aren’t as numerous in the knockoff; you can see how much empty space there is compared to the official one. If you’re going to use one, make sure you’re not standing on a wet or metal floor or you might get a deadly surprise. Budget chargers for iPads and iPhones are similarly constructed: a housing the same size and shape as the official, but the electronics inside barely fill the space. Here’s another side-by-side with iPad chargers (counterfeit on the right)…

iPad Chargers
Original vs Cheap iPad Chargers

…and a $2.95 iPhone wall charger, looking like something from a vending machine.

Knockoff iPhone Charger

Now, we’re not saying all off-brand charging accessories are bad (but a lot of them are, according to the BBC). You can save money, but don’t be tempted to save more than 50% or you might be in trouble. An iPhone charger (wall plug and cable) retails for around $25 and good alternatives, such as PureGear or AmazonBasics, can be found for close to $15. These, of course, will be of a different external design than the official Apple product, but feature similar build quality and safety. Beware of products that make an attempt to look like exact copies of official products but have a price tag one-tenth the size; these are designed to trick you into buying an inferior counterfeit while thinking it’s legit, much in the way that Ghosthunters is titled to confuse people looking to rent Ghostbusters at the local RedBox. In the interest of safety, be sure to look for logos of product-quality organizations, such as UL, CSA, and CE.

ul-csa-logo

At iFixYouri retail locations, we sell a variety of accessories for your devices, from protective and decorative cases to chargers. Our stores carry PureGear chargers, all of which carry either the CSA or CE label and are touted by our expert technicians. If your device was damaged by a faulty charger, either a charging port malfunction or a battery that suddenly doesn’t hold a charge or dies suddenly, iFixYouri can diagnose the problem and repair it quickly and with top-quality parts. We might even throw in a quality charger, too!


Photo credits http://www.righto.com/

Get Rid Of iPhone 4 Reception Problems Once and for All

The launch of iPhone 4 in 2010 created a buzz all over the internet as mobile phone users yearned to own the new technology. However, just like other products in the market, this phone was reviewed and tested by consumers – many people experienced problems with its signal. This mostly happened when the users placed their fingers or hand over the antenna on the left side of the phone, thus affecting the network coverage. iPhone 4 reception problems were serious, especially for people living in areas with low network coverage.

For people living in areas with higher network coverage, they only complained of a low network bar whenever their hands or fingers covered the antenna area. If you have been experiencing these reception problems, then you do not have to worry anymore because this issue can be fixed by following simple guidelines.


How to Get Rid of iPhone 4 Reception Problems

If your iPhone has reception problems, you shouldn’t throw it away and buy a new one, rather, you should get it fixed. There are several ways of fixing iPhone 4 reception problems. Listed below are some of them.

1) Buying an External Case

An external case is recommended because it acts as a protection for the phone while preventing your bare skin from touching the antenna. Apple sells these cases but a variety of options can be found in almost any mall or electronic store.

2) Balancing Your Hand

According to research, the majority of people experiencing this reception problem normally use their left hands to hold the iPhone. It is recommended that you use your right hand whenever you hold the device. This is obviously a greater challenge for left-handed people.

3) Using Tape

This sounds odd but most consumers who have tried this method accept the fact that it really helps in solving the reception problems. Apply a piece of tape at the bottom left corner of the iPhone. You can use gaffer’s tape to make the phone look elegant and also prevent the possibility of leaving behind a sticky mess.

Other Ways of Getting Rid of iPhone 4 Reception Problems

If the methods above don’t work, or you’re looking for more options, read on.

Remove the SIM Card

This problem can also be solved by simply removing the SIM card and reinstating it again. However, generally users don’t prefer this method because it is tiresome and irritating when the device is opened and closed frequently. Some people also claim that they lose their phone’s settings when they remove the SIM card.

Washing Hands Before Handling an iPhone

Some engineers also claim that washing hands before handling the iPhone helps prevent the reception problems. They claim that hand washing removes the natural electrolytes from your hand. This prevents the loss of signal when you hold the phone.

Some IT students also carried out research about the unique ways of getting rid of iPhone 4 reception problems. It was discovered that wearing latex gloves is a possible solution, though not so many people are comfortable with wearing them every time they handle this device.

Simply get the iPhone 4 Repaired

Some of these methods might work and some might not work. If you want to really get rid of iPhone 4 reception problems, you should ship it to a company that specializes in repairing iPhones, like iFixYouri. We will fix the iPhone 4 reception problems and ship it back to you.

What To Do If Your iPhone Touch Screen Isn’t Responding

LCD Screen Repair at iFixYouriAn iPhone touch screen that is not responding can be a challenging problem. The device is quite costly, so any issue that requires repair is automatically frustrating. When it stops working, it means that your main line of communication is cut off from the world. It can even endanger your livelihood, if you rely on your phone for work.

Here are a few things that a person can do when the screen becomes unresponsive.

Troubleshooting Unresponsive iPhone Touchscreen

Certain applications take up a great deal of memory, which can cause the phone to freeze up. This is very likely to occur when several programs are being run at the same time. If the phone becomes unresponsive, it is best to force the application to stop. To do this, hold down the home button until the application stops and the screen once again becomes responsive.

Restart the iPhone

If you’re unsuccessful in stopping the application, it may be necessary to restart the entire phone. The on/off button should be held until the red slide bar appears. Power down the phone and turned back on. This should make the phone responsive again.

Resetting the iPhone

Under rare circumstances, an iPhone touchscreen will still not respond after a restart. In these cases, it will become necessary to reset the phone. This is different from the above restart; the phone will be forced to shut down without the normal closeout process. Resetting the phone involves holding the on/off button and the home button at the same time until the Apple logo appears and goes away. After the device is off, it can be turned back on in a few seconds. By this time, the phone should be working again.

Restoring with iTunes

If none of the above seem to work, the next step is to connect the phone to a computer and open iTunes. On the Summary pane, a person can select “Restore”. If the phone does not appear in iTunes, there’s not much you can do yourself at this point, but you can still get it fixed or salvage the value of the phone.

Professional Assistance for Unresponsive iPhone Touch Screen

If the iPhone screen is still not responding, it may be necessary to take the phone in for professional repair or sell your iPhone for cash. An experienced repair shop, like iFixYouri, will be able to evaluate and fix the problem with no hassle. This will avoid further damage or loss of data in the phone. iPhones are very expensive and sensitive. Getting the job done correctly will save a lot of headaches down the line.

How to Change a Cracked iPhone Screen

How to Recover Data From a Damaged iPhone

You have finally bought an iPhone and you are enjoying every moment of it but unfortunately, the screen gets cracked or broken and you are confused because you do not know how to change a cracked iPhone screen. Some people might even decide to shop for a new iPhone since the broken one no longer seems attractive as it was before. When you find yourself in such a situation, you need the right tips and ideas of how to change an iPhone screen to save the hassle and expense of a new phone.

Tools Required – How to Change a Cracked iPhone Screen

Before you even start the process of changing the iPhone screen, ensure that you have the right tools, most of which can be found online. This helps you get the exact size that you need instead of shopping online where you are not very sure about the dimensions. If you prefer shopping online, ensure that you have the right dimensions that will be compatible with your device. Here is a list of the basic tools that you should have:

  • Replacement glass
  • Philips screwdriver
  • A wedging and scraping device or a razor blade
  • Superglue or double-sized tape
  • A pair of scissors
  • Q-tips and Rubbing alcohol
  • Heat gun or hair dryer

Step 1: Unscrewing The iPhone With a Cracked Screen

Cracked iPhone Screen

Check the bottom part of your iPhone and take keen interest on the side that has the Home button. You will notice two screws fitted on both sides of the USB port. Unscrew them using the Philips screwdriver. Also remember that it will not be necessary to remove the SIM card for you to open the device.


Step 2: Removing The Cracked iPhone Screen

The screen can be removed using two major methods. You can either use a scraping or wedging tool. A razor blade is mostly preferred because it can be fitted between the metal and the rubber to lift the screen. Alternatively, you can use a suction cup by placing it above the Home button then pulling it up gently. You will notice that the glass has been removed without damaging the rubber gasket that surrounds it.

Step 3: Separating The Screen From The iPhone

Cracked iPhone Screen

Check for the flaps that hold the phone and the screen together at the top right corner. They are normally labeled 1 and 2 attached to orange stickers. You will also notice the 3rd sticker placed under the 2nd flap. It should be released by lifting the black clamp.  At this point, you will notice that the screen has been completely separated from the iPhone.

Step 4: Detaching The Screws

The interior of the device has 5 screws along the side rails, 3 along the flaps and 2 on the opposite sides. These screws are of the same size and that means you should not worry about where to place them after completing the installation process. You will also notice a black tape over each screw and you can cut it off using a razor blade. The black tape is less important in this case.

Step 5: Separating The LCD From The Glass

Detach the LCD screen from the glass by putting the wedge between the rails then wedge the inner section out. For you to clear the top flanges, make sure the LCD drops down near the Home button. Use some little force if possible because the metal cannot get distorted that easily.

Step 6: Scrubbing The Adhesive

Use a wedging device or razor blade to scrape the glass leftovers or any other pieces along the metal frame. It is also possible to use a hair dryer or heat gun but this should be done carefully to avoid distorting the frame. The bonding agent may not dissolve by rubbing alcohol so you can try scrubbing using a Q-tip then removing it with a razor blade.

Step 7: Installing The New Screen

Cracked iPhone Screen

When installing the new screen, make sure the super glue does not cross to the Home button. You may also decide to use a double-sided tape but ensure it is trimmed properly. Adhesive should be applied along the black plastic at the top or bottom sides while excluding the middle part. Use the tweezers to control the double-sided tape so that you do not let your fingers touch it thus weakening its ability to stick. Also ensure that you take away the protective plastic found on the new glass where it is expected to touch the tape.

Step 8: Installing The LCD

Install the LCD glass and make sure it fits properly by sliding it from the bottom part of the device. Fix the screws back where they belong and also restore the 3rd cable into the clamp. Press the 1st and 2nd cable onto the connector by using a little pressure. Do not worry if you miss the connector several times because this is quite common.

Step 9: Assembling The iPhone

Restore the screen back to the iPhone by inserting the top part first. The sides should be attached to the connectors and also make sure the bottom fits in properly. When the LCD and screen are well-fitted, fix the remaining 2 screws back into their places found on both sides of the USB port.

DIY vs. Professional Repair

These are the most crucial tips on how to change an iPhone screen; however, as you can see, it is a long and rather confusing process. That is where we at iFixYouri come in handy. We can replace your cracked iPhone screen properly and inexpensively.


How to Clean a MacBook

For millions of people, their PCs and laptops are more than just machines. Due to the long hours spent at work or play on them, many people usually consider them as an extension of themselves and desire to have them in tip-top condition at all times. A MacBook is one of the most expensive and powerful personal computing devices available on the market today, and one of the most beloved by its users. Below are steps for how to clean a MacBook properly.

Importance of Cleaning Your MacBook

Cleaning MacBooksAccording to Jonathan Millman, Chief Technology Officer at Hooplah Interactive, a computer could “fry” if it is not kept clean. When dust, soot, and lint from the air accumulate and clog vents and coat internal components within a MacBook, it can cause the system’s Central Processing Unit — or its “brain” — to overheat. This is undesirable as heat is the major cause of failed components in most computer systems. Cleaning a MacBook regularly can save expensive maintenance costs in the future.

Cleaning the Exterior of a MacBook

When a MacBook has an accumulation of dust on the outside surfaces, it is a sure bet that there is dust on the inside, too. However, how one cleans the external dirt is very different from how one would clean the dust on the interior. To clean the exterior surfaces of the machine usually requires a soft, lint-free cloth and distilled water.

It is important that the cloth is soft to avoid scratching the surface of the MacBook. To reduce the risk of electric shock and damage to the MacBook, it must be unplugged from its power adaptor and the battery removed. If possible, one should lay the gadget on a soft surface or cloth, to prevent scratches from the work surface when one turns it over for cleaning.

Next, moisten the lint-free cloth with distilled water and wring it out so that it remains only slightly damp and not dripping wet. Then, wipe the exterior surfaces down with the damp cloth to get rid of the dust and dirt.

When cleaning the MacBook’s exterior, ensure that you do not spray water directly on the computer. Vitally, take care to ensure that water does not enter any of the ports. To remove any fingerprints and smudges, use a 1:1 solution of distilled water and rubbing alcohol. Alternatively, you may use a number of cleaning solutions commercially available for this job. A point to note is that Apple discourages the use of solvents, aerosol sprays, or abrasives for cleaning MacBooks.

Cleaning the Keyboard and Touchpad

Cleaning MacBooks

According to British microbiologist James Francis, who took a swab to 33 keyboards, a toilet seat and a toilet door handle in a typical office,  four of the keyboards he tested proved to be potential health hazards, while one had five times more germs than were found on the toilet seat. Considering this, and the fact that the MacBook’s keyboard is the area that a user touches the most, it is imperative to ensure that you clean the keyboard regularly and thoroughly.

However, due to the unique design of the keyboard keys on a MacBook, it is easy for cleaning fluids or water to enter the inside of the machine and cause problems. Therefore, it’s important to ensure that the cloth used for cleaning the keyboard is barely damp and does not drip. In addition, wipe each key individually for a more thorough clean instead of a general swipe of the entire keyboard.

What To Do If Fluid Drips Into the Keyboard

In case any cleaning fluid drips into the keyboard, turn it over immediately, then remove the battery and the keyboard, and then blot the screen with a paper towel. If possible, lightly blow the vents and the keyboard with compressed air. However, you must understand that any kind of fluid spilled into a MacBook has the potential to cause serious damage to the system. Therefore, if this happens, contact a professional MacBook repair technician as soon as possible, even if the laptop seems to operate normally at the particular moment.

Cleaning Ports and Outputs

Cleaning MacBooks

As with cleaning the rest of the MacBook, cleaning the ports would require you to power down your gadget and then unplug it from its power adapter or any peripherals such as external drives.

After doing that, use a soft cloth free of lint to wipe the exterior of the ports for any dirt, dust, or grime. If there is any dirt stuck or encrusted within the ports themselves, you may use a dry, soft brush, such an old, worn toothbrush, and some alcohol to loosen the dirt. However, you must allow the alcohol on the MacBook to dry off completely before you plug in your computer to the main power.

In case something goes wrong while cleaning your MacBook, or if you’re cleaning your MacBook because it’s not running smoothly in the first place, you can send it to MacBook repair specialists iFixYouri.