

Introduction
The Samsung Galaxy S8 screen is moderately difficult to tear-down. Proper attention should be given to safely loosening the adhesive strips with heat. Keep an eye out for the connector cable to the fingerprint sensor on the back panel, and the screen flex cable which feeds through an opening in the body. So let’s get to it! Look for the text directions below the video. Check out iFixYouri on youtube for more repair videos.
Tools Needed:
- Metal Spudger
- Phillips Head Screwdriver #000
- Plastic Spudger
- Plastic (Playing) Cards
Recommended: Magnetic mat, screw capsules
General Repair Guidelines:
- Always use good lighting – smart device components are small and you’ll need plenty of light to see what you are doing.
- Maintain a clean, organized workspace so you don’t lose or confuse any components.
- Apply enough heat to loosen adhesive but not enough to damage the device.
- At any point during a repair, if the adhesive becomes hard to separate, apply more heat.
- After separating adhesive, keep the back panel, housing, and screen in close proximity until you disconnect all flex cables or other wire cables.
Samsung Galaxy S8 Teardown Steps
Click an image to enlarge
Heat up the device’s interior adhesive strips with a dehydrator, heat gun, or heat mat. Heat guns provide a quick solution but use caution as it can be easy to overdo it and damage the device.
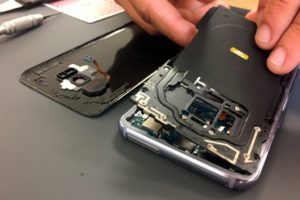
Use the metal spudger to slowly and carefully separate the back panel of the phone from the body. Start on the bottom edge of the device and proceed slowly.

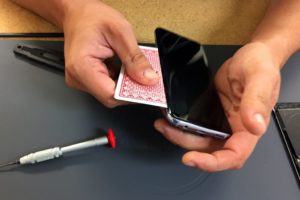
Continue using the metal spudger or use playing cards or guitar picks to gently separate the adhesive up the sides and top. Above all, don’t push too deeply towards the center of the device.

Disconnect the Sensor Cable
The rear fingerprint sensor connects to other components via an orange cable, so do not pull the back glass far from the frame. The cable can be disconnected from the back panel with a spudger.
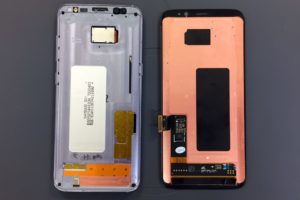
Now you’ve disconnected the fingerprint sensor cable and separated the adhesive on all edges. After that, the back panel can be removed and set to the side.
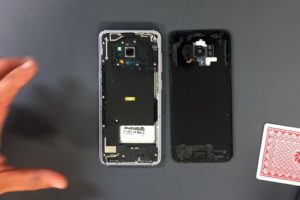
Unscrew visible screw heads starting from the top. These connect the wireless charging assembly to the body. The three screws along the bottom do not require removal.
Set aside the wireless charging assembly. Using the spudger, disconnect the battery’s orange-colored flex cable which is connected to the logic board.
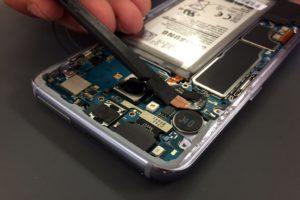

The screen connects to the board by an orange flex cable located near the edge of the phone. Disconnect it using a spudger.
Separating the Galaxy S8 Screen Adhesive

Removal of the Galaxy S8 screen may require reheating the adhesive. Slide the metal spudger between the screen and body. Gently slide along the bottom of the device, separating the adhesive. WARNING: Be careful not to damage the flex cable on the right side of the phone. Do not pry too deeply into the device on the bottom or right side.
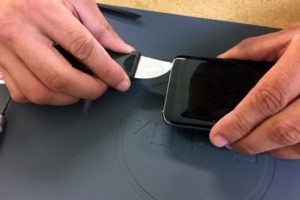
A plastic card can be used to separate the adhesive on the sides and top of the phone. However, you will have to angle the card to slide up the sides of the phone because of the glass curvature.
Watch that Flex Cable!
The screen’s flex cable feeds through a hole in the right side of the body (if you are looking at the screen). Take care when pulling the screen away from the body because there can be complications from rushing. For instance, the flex cable can get caught on the edge of the opening.
That’s it! You’ve removed the Samsung Galaxy S8 screen assembly. In conclusion, we hope you’ve learned something and had fun. You can do the removal steps in reverse if you are attempting to install a new screen assembly.
For Help, Repairs, or Parts
If you need parts or tools for this repair, or if this repair is too much to attempt on your own and you need a repair professional skilled at Samsung Galaxy S8 repair, contact iFixYouri at 888-494-4349 or www.ifixyouri.com.