What to Do if You Drop Your iPhone 7 in Water?

Water damage is not a death sentence to an iPhone. Chances are we’ve all experienced it. We drop our precious phone in some sort of liquid. We jump in the pool with our phones in our pockets. We drop it in the toilet. We spill a beer on it. Inevitably something happens.

Being that water damage repair is one of our specialties, we are asked this question a lot, dozens upon dozens of times per day. While the new iPhone 7 is not completely waterproof, it is fairly water resistant. With the help of some adhesive sealing the screen, some rubber gaskets around certain components, and some tweaks in the design, the chances of needing an iphone 7 water damage repair are lower than previous versions. This does not mean that you should try to push the phone to its breaking point and it certainly does not mean it’s immune to water damage. Something as simple as having your phone in the bathroom while you take a hot shower can cause problems.

First Steps After Dropping an iPhone 7 in Water

The process is quite straight forward and taking quick action can help decrease your chances of failure, and increase your chances of having a good, working device. This will work on other devices as well, but since we’re talking iPhone 7’s here, we’ll use this as our main example.

STEP 1) Turn Off the Device

First and foremost, turn off the device, and if it’s a model phone where you can easily remove the battery, do so. It is highly likely that your phone will work after you pull it from the water. The number one killer of water damaged phones isn’t actually the water, it’s the current that travels through the logic board after it gets wet. When you cross electricity with water, a short will occur.

iPhone 7 Power Button

STEP 2) Open All Covers and Ports

For an iPhone 7, pop out the SIM card tray by inserting the end of a paper clip in the small hole on the right side of your phone, take off any case, do not plug it in. You want to make sure if water has gotten in, that there is a way for the water to get out. You don’t want the liquid to be trapped inside if at all possible.

iPhone 7 SIM Card Removal

STEP 3) Dry Out Your Phone

We don’t advise to shake the phone, as this can cause water to get deeper into the board. Instead, we recommend using some sort of desiccant. You want something that will draw the water out. A shop vac is an okay application. Silica gel is ideal. A dehumidifier works wonders. A container of Damprid from Home Depot can also do the trick and will only run you about $10.

Steer clear of using anything that generates an excessive amount of heat, as this can only further damage the device. Do not place your phone in an oven or toaster. This is all around a bad idea.

A combo of Damprid, somewhere with good air circulation, and opening your device as much as possible will be your best chance of survival.

What do you do after your iPhone has been soaked?

After you complete the simple steps above, you need to wait. Do not try to power your phone on in any time less than 36 hours. It’s super important that your phone is completely dry before any attempt is made. If after 36 hours you see any liquid, do not try to power it on, you’ll just have to wait a bit longer. Let that Damprid soak up any liquid.

When you are confident any liquid that the device may have come in contact with is dry, then and only then try to power it up. If you get no power initially, it may need a good charge. Try giving it a short charge. If you don’t notice anything light up on the screen, chances are your battery may be shot, and possibly other components.

At this point, you may need to bring your phone to a repair shop or use a mail-in service for deeper diagnostics and help. iFixYouri has a no-fix, no-fee policy. We offer free round trip shipping on all services, including all of our iPhone 7 Repair Services.

Regardless of the state of the device, we recommend a good cleaning by a professional repair service after your device has been wet. Water can leave residual minerals and build-up on the components, which should be removed to ensure longevity and good functionality.

What should you do with a device that can’t be repaired?

In the event that iFixYouri cannot fix your device, there are options. The device can be sent back to you. It can be recycled (if it carries no value), or if it’s a relatively newer model (iPhone 5 or higher), you can sell your iphone and use the money you earned to purchase a new device.

We know how frustrating water damage can be. We see it every day. By taking the correct steps immediately after it happens, you can dramatically increase your odds of having a good, working phone again.

If you have any questions or need professional help for iPhone 7 Repairs, feel free to reach out to us at iFixYouri.com, or call us at 888-494-4349.

Galaxy S8 Screen Teardown: How To

Introduction

The Samsung Galaxy S8 screen is moderately difficult to tear-down. Proper attention should be given to safely loosening the adhesive strips with heat. Keep an eye out for the connector cable to the fingerprint sensor on the back panel, and the screen flex cable which feeds through an opening in the body. So let’s get to it! Look for the text directions below the video. Check out iFixYouri on youtube for more repair videos.

Tools Needed:

Recommended: Magnetic mat, screw capsules

General Repair Guidelines:

  • Always use good lighting – smart device components are small and you’ll need plenty of light to see what you are doing.
  • Maintain a clean, organized workspace so you don’t lose or confuse any components.
  • Apply enough heat to loosen adhesive but not enough to damage the device.
  • At any point during a repair, if the adhesive becomes hard to separate, apply more heat.
  • After separating adhesive, keep the back panel, housing, and screen in close proximity until you disconnect all flex cables or other wire cables.

Samsung Galaxy S8 Teardown Steps

Click an image to enlarge

Heat up the device’s interior adhesive strips with a dehydrator, heat gun, or heat mat. Heat guns provide a quick solution but use caution as it can be easy to overdo it and damage the device.

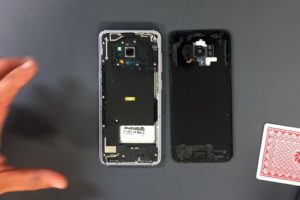
Use the metal spudger to slowly and carefully separate the back panel of the phone from the body. Start on the bottom edge of the device and proceed slowly.

Continue using the metal spudger or use playing cards or guitar picks to gently separate the adhesive up the sides and top. Above all, don’t push too deeply towards the center of the device.

Disconnect the Sensor Cable

The rear fingerprint sensor connects to other components via an orange cable, so do not pull the back glass far from the frame. The cable can be disconnected from the back panel with a spudger.

Now you’ve disconnected the fingerprint sensor cable and separated the adhesive on all edges. After that, the back panel can be removed and set to the side.
Unscrew visible screw heads starting from the top. These connect the wireless charging assembly to the body. The three screws along the bottom do not require removal.
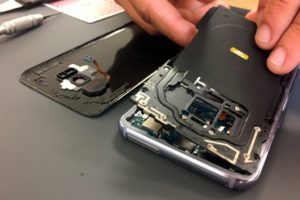
Galaxy S8 Screen removal step 5

Set aside the wireless charging assembly. Using the spudger, disconnect the battery’s orange-colored flex cable which is connected to the logic board.
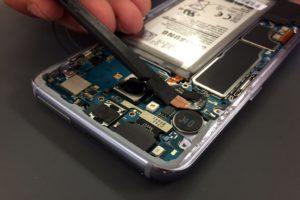
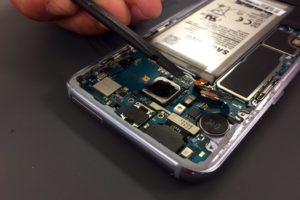
The screen connects to the board by an orange flex cable located near the edge of the phone. Disconnect it using a spudger.

Separating the Galaxy S8 Screen Adhesive
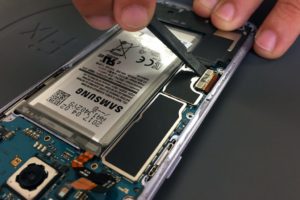
Removal of the Galaxy S8 screen may require reheating the adhesive. Slide the metal spudger between the screen and body. Gently slide along the bottom of the device, separating the adhesive.  WARNING: Be careful not to damage the flex cable on the right side of the phone. Do not pry too deeply into the device on the bottom or right side.
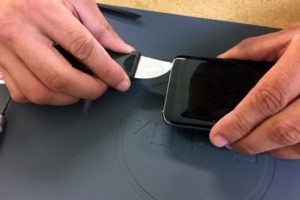
A plastic card can be used to separate the adhesive on the sides and top of the phone. However, you will have to angle the card to slide up the sides of the phone because of the glass curvature.

Watch that Flex Cable!
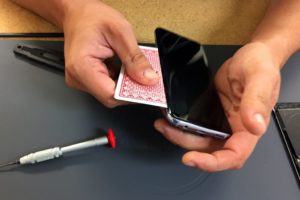
The screen’s flex cable feeds through a hole in the right side of the body (if you are looking at the screen). Take care when pulling the screen away from the body because there can be complications from rushing. For instance, the flex cable can get caught on the edge of the opening.

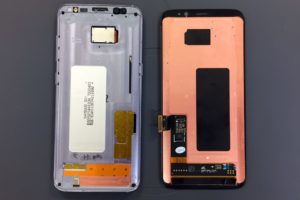
That’s it! You’ve removed the Samsung Galaxy S8 screen assembly. In conclusion, we hope you’ve learned something and had fun. You can do the removal steps in reverse if you are attempting to install a new screen assembly.
For Help, Repairs, or Parts

If you need parts or tools for this repair, or if this repair is too much to attempt on your own and you need a repair professional skilled at Samsung Galaxy S8 repair, contact iFixYouri at 888-494-4349 or www.ifixyouri.com.

When To Replace Your Phone’s Battery

Because of modern society’s love of smartphones, most of us keep a watchful eye on battery levels. When our phone’s power level is getting low, life can become a rush to find an outlet to charge back up so we can return to our interconnected day. As cell phone batteries age, they lose the ability to hold a charge and our outlet search anxiety becomes more frequent. But did you know there is also a safety risk involved with carrying around a phone with an old battery? Old batteries can expand, damaging the device they were meant to power, heat up, and sometimes even explode.

The Brief Life Story of a Battery

Rechargeable batteries may run for a long time but they do have a limited lifespan. iPhone batteries, for example, are good for roughly 600 charge cycles, after that performance starts to degrade, necessitating a battery replacement. Sometimes a replacement is required much earlier, such as when the unit routinely fails to charge, gets noticeably warmer, or runs out of power quickly.

What Causes Batteries To Explode?

Cell phone batteries are lithium ion batteries, which differ from the alkaline AA’s you have in your cable remote. Lithium-ion batteries are rechargeable and rely on the chemical lithium as their power source. Typically these are built directly into smartphones. Lithium-ions are a newer type of battery than alkalines and allow quite a bit more voltage. However, this increased power also increases some possibilities for combustion. Cheap manufacturing, rough treatment or impacts, overheating, or improper charging process (determined by device software, as well as accessories) can sometimes lead to a thermal runaway which concludes with a literal bang.

So How Do We Take Charge of Our Battery Life?

Always make sure to use high quality charging accessories. Many modern phones provide notifications when charging blocks are not the proper voltage. Pay attention to them. They do this to get the best performance and quality out of your battery. Avoid the super discount junk chargers found in gas stations and opt to purchase quality accessories from specialized phone companies, like iFixYouri.

Owners may choose to replace batteries themselves as sometimes spare batteries are available online at reasonable prices. However, the benefit of bringing your phone with the old battery intact to a professional repair company like iFixYouri for battery replacement is that you can be sure a high-quality battery is installed correctly and comes with a warranty.

iFixYouri Opens 2nd Jupiter, FL Location, 5th in Palm Beach County

JUPITER, FL – (May 15, 2017) iFixYouri, the Palm Beach Gardens-based device repair company, has opened their 5th Palm Beach County location, bringing the total to 16 stores in Florida and Massachusetts.

With the opening of their newest store this week, iFixYouri marks their 2nd retail location in Jupiter, FL in Concourse Village at the intersection of Alternate A1A and Indiantown Road. iFixYouri Jupiter on Indiantown opened to better serve customers located in the North Jupiter and Tequesta areas. This location is the 5th Palm Beach County location, bringing iFixYouri to 16 total retail locations in Florida and Massachusetts, and a dedicated mail-in service center. iFixYouri specializes in providing same-day repair in cell phone repair and computer repair.

iFixYouri Jupiter on Indiantown provides walk-in repair services for the public who are in need of any type of tablet, computer, or smartphone repair. Most repairs are completed while customers wait. The electronics repair experts at iFixYouri are well known for their top-notch customer service, backed with affordable pricing on all repair services.

iFixYouri is very proud of this new location. “We’re really happy to expand in Jupiter and provide our electronics repair services to the Jupiter and Tequesta area. Our repair experience and quality customer service provide a great value to residents here,” said Chris Johncke, iFixYouri’s founder and CEO. “This location is very central to many things to see and do in the town of Jupiter. It’s a very convenient location for our customers to come in, get their device repaired, and go about their day.” Students, and civil servants, get 10% off all repairs.

Johncke has lived in the area for 20+ years, and enjoys the scenic town. After scouting multiple locations, he settled on the intersection of Indiantown Road and Alternate A1A, as he sees it as the perfect distance from both popular tourist attractions, such as bustling Harbourside Place and the Jupiter Lighthouse, and local schools and hangouts. “We believe that iFixYouri will be a great addition to this wonderful plaza and this part of Jupiter. The response and feedback from the community has been amazing since we expanded to Abacoa Plaza a few months back,” he adds.

Other iFixYouri locations in Palm Beach County are dotted all over from Abacoa to as far south as Okeechobee Blvd and everywhere in between. Additional stores are located in Orlando as well as the Boston metro area, with more to come. The company also has an established online mail-in repair business, able to take in devices from anywhere in the country, with repairs completed and sent back to the customer in as little as 24 hours.

iFixYouri Jupiter on Indiantown is located at:
75 E Indiantown Road, Suite 604
Jupiter, FL 33477
561-337-2208

About iFixYouri Smart Device Repair

iFixYouri, a rapidly growing repair company that provides repair services for smartphones, tablets, and computers, is headquartered in Palm Beach Gardens, FL. iFixYouri was founded by CEO & President Christopher Johncke in 2010 in Lake Park, FL.

Inc Magazine has named iFixYouri one of the Inc 5000 fastest growing companies three years in a row. Currently, iFixYouri has 5 locations in Palm Beach County, FL, 8 in Orlando, FL, and 3 in Boston, MA. For more information, please visit http://www.ifixyouri.com

To learn more about iFixYouri, please contact:
Michelle Zausnig, Marketing Director
(888) 494-4349
michelle(at)ifixyouri(dot)com


New iPad Under the Skin: Just an Updated iPad Air?

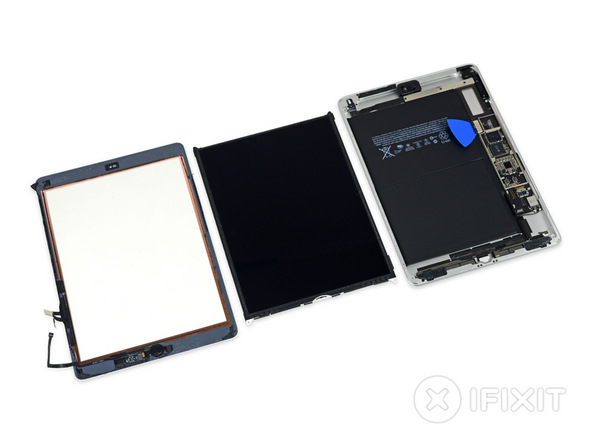
Last week on the iFixYouri blog, we mentioned the new iPad, now being widely referred to as iPad 5. We wrote that this new 9.7-inch iPad seems to be just a first-gen iPad Air with a few tweaks and less Air-ness (thicker, heavier). It turns out that we weren’t totally wrong. The device-dismantling extraordinaires at iFixit found evidence of this when they performed a teardown of the device.

“So remember how we said this was similar to the first Air? We were serious—take a look inside the Air 1 and iPad 5 respectively. Not much has changed.”

The teardown pros were even able to perfectly attach a iPad Air 1 display to the iPad 5. The main difference, they noted, is that the LCD and glass are unlaminated, hurting picture quality a tiny bit while making repairs a whole lot easier. Apple claimed this screen is “new” and will be better than ever, but iFixit doubts that claim.

“In Apple’s press release announcing the iPad 5, they told us it comes equipped with a “brighter 9.7-inch Retina display.” Our question is: brighter than what? It doesn’t look that different from the Air 1’s display. If they mean brighter than the Air 2, then that may simply be due to reverting to the unfused display design of the Air 1.”

On the outside, it’s obvious Apple manufactured a new casing. There are a few major differences from the Air housing: the lack of a mechanical lock switch, a single row of speaker holes, and microphone holes instead of a larger microphone “vent.” Inside, there’s a Touch ID sensor and the associated hardware necessary for running that. However, this takes the repairability down a few notches.

“Thumbs up for fingerprint reading. Thumbs down for a harder repair, since the sensor is uniquely paired to its logic board at the factory. At least this lovely button is still a button (unlike the solid-state un-button that debuted on 7-series iPhones).”

There you have it. The screen on the iPad 5 will be easier to replace (and that’s the most common repair) but the addition of a Touch ID button will cause the same problems as with those repairs in the iPhone 7 and 2016 MacBook Pro. So go ahead; buy the new iPad 5, safe in the confidence that iFixYouri will be able to repair whatever you do to it. Just bring it to any of our walk-in locations or use our convenient mail-in repair service.

The Samsung Galaxy S8 Is Here, and It’s Worth the Wait

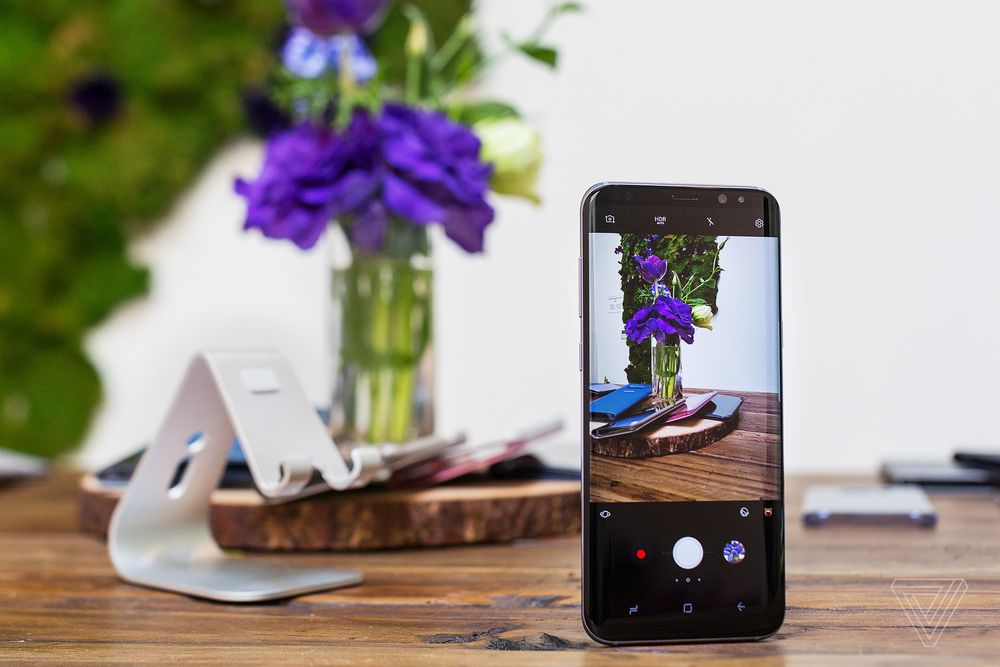
We’ve waited months, and after a particularly anxious morning waiting for 11am to roll around, the wait is over. The Samsung Galaxy S8 is official, and it’s everything we were expecting. Well, it helped that we had a hefty dose of leaks. What we get is a huge redesign of the smartphone and a departure from the design language of previous models.

Let’s talk about bezels. They’ve been slimmed down dramatically, practically scrapping the typical smartphone design in favor of maximizing the on-screen real estate. The physical front navigation buttons are gone, replaced with on-screen buttons that disappear when not in use. The fingerprint reader is confirmed to have been moved to the back, in an awkward position next to the camera lens. There’s no logo or other identifying features on the front, other than the usual cluster of sensors at the top including the front camera, earpiece, iris scanner, and proximity sensor.

There are two sizes of the S8: the “regular” Galaxy S8 will feature a 5.8-inch display, and the Galaxy S8+ will have a bump to a 6.2-inch screen. This is, quite literally, a huge change. The latest in the phablet Note series were 5.7”; the regular-size S8 will be a bit larger than that, and the S8+ will be absolutely massive. Combine that with the minimal bezels and curved edge, and that’s a lot of screen. Oh yeah, the “Edge” display is no longer optional; the screens of both models will curve along the long edge. Both displays are certified as HDR (high dynamic range) by The UHD Alliance.

The specs under the hood are impressive as well. The S8 will be powered by four 2.3GHz cores and four 1.7GHz cores, and the S8+ gets a little boost: four 2.35GHz cores and four 1.9GHz cores. As usual, the US will get a Qualcomm chip (the new 835) while the rest of the world will have to make do with Samsung’s own Exynos 8895. Both devices will have 4GB of RAM, 64 GB of storage (expandable with a MicroSD slot), a USB-C port, and IP68 water and dust resistance. The S8 has a 3000mAh battery similar to the S7, but the Galaxy S8+ packs a 3500mAh battery, which is a 100mAh downgrade from the Galaxy S7 Edge. Is Samsung being a little conservative due to the catastrophic battery failures in the Note 7? We expect the execs to make an announcement regarding that question at some point.

In the camera department, a 12MP rear camera (seems the industry has hit the ceiling in this department; see iPhone 7 and Google Pixel) with optical image stabilization, and the front shooter gets an upgrade to 8MP. Samsung is boasting the S8 will have two connection-based firsts: the first phone with “gigabit-class” LTE connection and the first to carry Bluetooth 5, both of which are pretty cool but not entirely clear at this point.

All year long, Samsung has been pushing their new voice assistant, Bixby. To this end, they added a dedicated hardware button to the device, along the labs. Bixby has a lot of promise; it’s the brainchild of Viv Labs, founded by personnel who were part of the original team behind Apple’s Siri and later acquired by Samsung. Bixby is all about context; it can search for images, translate languages, and give you information about landmarks and icons. Aim the camera at a product, and Bixby will try to help you buy it online. Such a massive leap forward in this kind of technology will undoubtedly have glitches, so we’ll wait until we get some hands-on time before we pass judgement. Samsung also promises to release an SDK for Bixby, allowing third party apps to utilize it.

As we’ve mentioned before, Samsung needs the S8 to be the best phone it’s ever made. The lack of a phablet has left a big hole in the company’s product lineup, and they’re counting on the S8 and S8+ to fill that hole while making us forget about the nightmare PR the Samsung faced in 2016.

Both devices will be available for preorder on March 30th and we’ve been promised shipping in the US on April 21st. It will be launched in five colors: black, gray, silver, gold, and coral blue, and early speculation sees the phone starting at $720 for the S8 and $840 for the S8+. There’s all sort of deals from every major carrier (even Best Buy is offering the device unlocked at launch) so be sure to check with your provider.

Find Your Friends and Family with Google Maps Locations Sharing

In the world we live in today, it’s natural to be wary about your location being widely known via technology. Sometimes, however, it can be important. Google+ users have been using the Locations function in order to keep track of friends and family. It gives them the peace of mind in knowing where their children are, or maybe just as a way to see what their friends are up to before texting them. But right now, that feature is migrating to Google Maps, and it hasn’t been a smooth transition.


Normally, it’s easy to access Locations from the Google+ app. For the last few weeks, users are just seeing a message telling them to move to Google Maps when they head to the Locations tab in Google+. Simple enough, right? Not so: the feature isn’t active yet in Google Maps. If they tap the “switch to Maps” button, it’s just a redirect to a Google help page offering the helpful tip of updating Google Maps because the new feature isn’t live in their current version. Fair enough, so go to update the app and…get a redirect to the Play Store, with no update to be found.


It seems like this is just a disconnect between departments. The feature works fine in Maps, and won’t be too difficult for those familiar with the Google+ version. It just looks like the Google+ pulling the plug too soon without checking with the Maps team to make sure it’s ready on their end. A rare slip-up from the normally-close-knit Google ecosystem, but it’s just adding to the annoyance over Google shuffling around their already-over-complicated native app market.


Using the new feature in Maps is easy. Just pop open the navigation drawer within the app—”Share location” is currently marked with a little “NEW” badge. You can leave location sharing on indefinitely, or set it for a certain period of time (like an hour). The sharing goes out to certain people that you’re connected with, or you can send a link out via text message.


When you share your location with people, you’ll appear in a little bar at the top of the map, and they’re a tap away from knowing where you are. The bottom of the map shows location information (like restaurant info) and a toggle that lets them share their location back with you. Once you’re connected, shared locations will appear with a little profile pic in the main map interface, but they can be toggled off.


Of course, you’ll need GPS enabled to use this new feature. If your smartphone is having trouble connecting to GPS, bring it to iFixYouri for a checkup. We have 15 locations nationwide (and more coming soon!) as well as a convenient mail-in service for all sorts of devices. If your current smartphone is too old for the update, iFixYouri also sells refurbished devices in stores, so you can upgrade today and save some cash!

Apple Watch Gets Siri and Theater Mode in 3.2 Update

If you own an Apple Watch, be sure to download the new update. WatchOS 3.2 was released today and will bring bring two key Apple features to the smartwatch line: Theater Mode and SiriKit. This is the first major update since Apple released the watchOS 3 update in September 2016, and while 3.2 isn’t as big as that, it’s interesting to see how the company continues to innovate in the smartwatch world.


SiriKit has been in high demand to be brought over to the Apple Watch. Simply put, SiriKit is a feature allows you to convince Siri to interface with non-Apple applications and settings. This enables voice commands to activate third-party applications. In practice, this lets Siri do more for you on the Watch, like calling an Uber or sending a message. So far this is just limited to apps with designers who built a Siri-activated feature, but that covers the majority of third-party apps that people use today. Finally, you can literally just talk into your wrist and a car will come to pick you up!


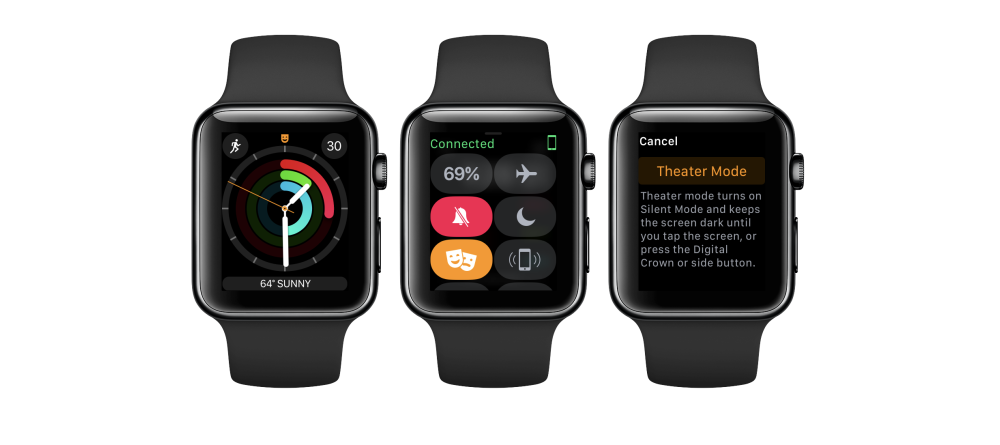
Most people have been hyped up about Theater Mode. Enabling it allows you to mute sounds and disable the raise-to-wake feature of the watch, meaning that the screen won’t light up when it senses your wrist turning over. Think of it as the final evolution of the current Silent Mode, eliminating all the lights and sounds the watch would make when triggered by movements or alerts so it won’t bother you and anyone around in situations that demand silence and darkness…like, say a theater. You’ll still receive haptic feedback, the little buzzes and taps for incoming notifications, and view notifications by manually waking the watch’s display. Theater Mode can be activated by swiping up from the bottom of the Apple Watch’s display and tapping the drama-masks button. Once you turn Theater Mode off, your Apple Watch will go back to your usual settings.


Downloading watchOS 3.2 is a snap. Just go to the Apple Watch app on your connected iPhone, navigate to the General tab, and then to Software Update. Your Apple Watch must have at least 50 percent battery, be placed on its charger and within range of your iPhone for the download. Be patient! The result is two major steps forward for your smartwatch, and you won’t regret it. 3.2 is available for all Apple Watch models, but you must have an iPhone running iOS 10 or later to download the updated software. If you have any issues with your Apple Watch or any other smartwatch or Apple device, iFixYouri is here to help! Just bring it in to your nearest iFixYouri or use our nationwide mail-in service!

Smartphone, Tablet and Computer Repairs and News